My First Tutorial!
EASY SKIRT APRON
I was searching online for an easy apron tutorial. I didn’t want bells and whistles and I didn’t want the top part that usually goes over your neck. I just wanted something simple that I could wipe my hands on while cooking and just toss in the wash when it was dirty. I couldn’t find it. SO…what is a crafter to do? I made one. I think it’s perfect. I used scraps that I had and didn’t buy one thing to get this done. It turned out so well, I thought I would make a tutorial for all those others like me who just want something simple. This is my first attempt at a tutorial, so you may have to bear with me. I may explain some things too much and others not enough. PLEASE send your comments!
SUPPLIES:
- About a ½ yard of fabric
- 2 yards of ribbon for the waist belt
- Embellishment ribbon (optional)
- Coordinating thread
DIRECTIONS:
- My piece of fabric measures 28” x 18”, 22”x18” should work too. Lay out your fabric and determine the top of the apron.
- Put a hem in the bottom of the fabric by folding up ¼” and ironing and then another ¼” and ironing. Pin this in place.
- Do the same hem on both sides and pin in place. NOTE: I clip the corner of the first fold to keep the hem nice and neat at the corners.
- Do a zig-zag stitch (or serge) the top, unfinished edge of the fabric. You want to contain the top edge inside the stitch so the fabric no longer frays.
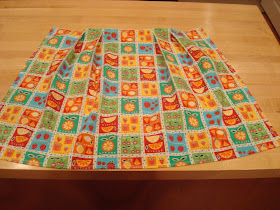
- Remove any pins you have in the hems. Now it’s time to start the pleats! Fold your fabric in half and then half again and iron. These fold lines will be your guide lines for the pleat placement. Once you have these lines, fold the fabric to form about a one-inch pleat. You should have two pleats on each side, one on either side of the quarter width mark. I just did my by sight. Don’t freak out about the placement just find a place that looks right and iron in the pleat. Here’s what mine looked like:


Once you have your pleats ironed in place, pin them. Them do a straight stitch across the top to secure them in place.
- Now on to the fun part! Use your 2 yards of ribbon to add your waist tie. I found the halfway point in my ribbon and lined it up with the middle of my apron. I pinned the ribbon in place and sewed a rectangle (across the top, down about ½ inch, across again, up about a ½ inch to meet up with where I started) to secure it to the apron.

- When I got done with that, I thought it needed a little more. It’s up to you. You can be done here or you can keep going. I just took a smaller, orange, grosgrain ribbon scrap and sewed it on top of my white satin ribbon.

- Remove all your pins and lightly iron anywhere it looks lumpy. But be careful satin ribbon can melt easily if the iron is too hot! This apron was supposed to have an orange tie…oops.

NOW YOU’RE DONE!!!
I would show you what this looks like on, but I am home alone tonight, and currently in my oh so comfy, but oh so ugly sweats.
Send pictures if you make this! And please send comments if I need to be clearer in any step!!!
Happy Crafting!


No comments:
Post a Comment